T-Up Documentation
Do you want to get more information or are you confused? In this page you can learn almost everything about T-Up.
Installation
T-Up is very easy to install. All you need to do is:
-
Download zip file
-
Extract the T-Up folder inside zip file
-
Open the T-Up.exe file
-
Login to your google account or continue as guest
T-Up Usage
When you login T-Up for the first time, you can get confused so here we explained every feature here for you:
This is the first screen you see, when you open T-Up:

We will go over all buttons and features, lets start with top middle buttons:
1- Section Buttons

These Buttons lets you switch between Trade Up finder and calculator sections of T-Up. For now, we will stick with Trade Up finder part. If you want to learn more about calculator you can Click Here.
2- Sidebar
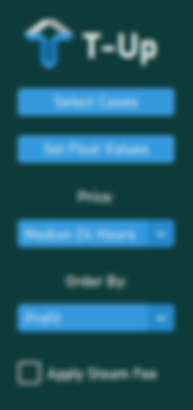
There are many buttons on sidebar:
-
Select Cases: Selects the cases to use in Trade Ups.
-
Set Float Values: Sets a default value for each condition, increase or decrease float values to get harder or easier Trade Ups.
-
Price Menu: Sets the price information that T-Up will use while calculating Trade Ups.
-
Order By: Sets how T-Up should order the Trade Ups by Profit or Profit/Trade.
-
Apply Steam Fee: Applies steam fee to Trade Up outcomes.
3- Filter Entry
Filter is in bottom side of T-Up GUI. It is an advanced feature so we advise learning it last. It basically lets you filter Trade Ups with conditions like Cost<20, Profit>120 etc. If you want to learn more about filters Click Here.
4- Create Trade Ups Button
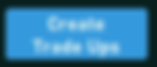
After setting your features, you can click Create Trade Ups button to find profitable trade ups. After some waiting you will see your trade ups, if you want to learn how to analyze your trade ups Click Here.
How to Analyze Trade Ups
When you create your trade ups you will see a screen like this:

1- Change Page Buttons

At the bottom you can see previous, next buttons and page number information (1/2561). In the example image we have 2561 trade ups and we are on first page. You can click previous next buttons to change the page and if you want to go to a specific page like 42th page. You can type 42 in Filter Box and press enter.
2- Weapon Informations

Here top left number represents float value for that weapon, X5 means we need 5 of this weapon for the trade Up, and bottom part is the name of this weapon. Also you can click to the weapons image and it will give more advanced informations about the weapon.
3- Advanced Weapon Information

In this pop up window, you can access many informations like API price, rarity and collection. If you want to compare API price with other markets, you can click the market buttons on the right side. After comparing prices if you think that API price is too low compared to other markets you can click Ban Weapon button to remove all trade ups containing this weapon.
4- TradeID
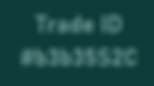
TradeID is one of the best features that T-Up has. You can TradeID at middle of all Trade Up pages you can copy it, then paste to calculator to get advanced information about Trade Up or you can save your trade ID's in a notepad instead of writing weapon names. If you want to learn more about calculator and usage of TradeID Click Here.
Calculator
To open calculator you can click Calculator button on the top middle of the screen.
When you open calculator you will see a screen like this:

1- Sidebar

There are 3 Features on Calculator Sidebar:
-
Stattrak: Switch to change between Stattrak & Non-Stattrak
-
Rarity: Option Menu to select Rarity.
-
TradeID: Paste your TradeID here and press Enter. It will fill the calculator with your TradeUp
2- Add Weapon

You can click one of these buttons to add a weapon to Calculator. After clicking it will open you a pop window with many tools to help you find weapon you are looking for.
3- Edit Weapon

When you add weapon to calculator it will look like this. At bottom box there are price and float values. At top part there are edit, copy and remove buttons:
-
Edit: Opens edit weapon window, you can set new price and float values for weapon there.
-
Copy: Creates another copy of weapon in calculator.
-
Remove: Removes weapon from calculator.
4- Outcome

When you will all of the calculator like image above, you can scroll down to see outcomes of the Trade Up like this:
Here if you want you can play with Average Float value to see how does profit changes. Also if you want to check prices of outcome weapons you can click on them and open advanced weapon information screen. Also you can see outcome weapons float value on top left corner of their image.

Filters
Filter is an advanced and very effective tool. If you want to find a good Trade Up for your needs, it will help you a lot for sure.
Filter is located at bottom middle of your screen.
1- How to Add and Remove Filters
You can write your filter inside left box and press Enter. If you want to clear filters, you can click the Reset All Filters button.
2- Filter Format
Filters are in condition format and while writing filters you can use these 4 operators:
-
Equal: ==
-
Not Equal: !=
-
Bigger: >
-
Smaller: <
Example Filters: Cost<10, Profit>120.
Important note: Features must always be in left side of the condition.
2- And / Or Operators
If you want you can set two conditions at the sametime. To do that you can use And/Or operators:
-
And: &&
-
Or: || (if you dont know how to write |, you need to press "Ctrl + Alt + <" at the same time)
Lets say you want trade ups that are either has "Profit/Trade > 100$" or "Profit>135". Meaning if a trade up has one of these conditions we will keep it, otherwise we will remove it. For this task you can write something like this:
-
Profit/Trade>100||Profit>135
Another filter example that sets Cost value between 10$ - 30$ range.
-
Cost>10&&Cost<30
3- Change Page
Its a small thing but, you can type any page number to Filter Entry and go to that page.